Showing posts with label Muddaritaville Stencils. Show all posts

Wednesday, October 1, 2014

Barstool makeover ...

I started this post a year ago and just realized I never finished it or published the post. Whoops!
Above is a picture of our kitchen when we first moved into our house in 2010 (the walls are primed in this picture, they were originally burgundy). We purchased the Oak swivel barstools off Kijiji.  We don't have room for a dining room so our Kitchen Island is our table and good comfortable chairs were important.  The stools were great at first but they have become a dropping spot for everything ... lunch bags, purse, courier packages, you name it!  Arghhhhh! They were really bothering me so I started searching for new ones.  Tada! I purchased a set of Tabouret metal barstools from Overstock in black (the picture below is the metal finish)
I LOVE them in black and with the Kitchen painted and foot rest on the island painted out in black they are going to look STUPENDOUS!
So after the new black barstools arrived we put the oaks tools in the back shed aka the Spider Den creepy!.  The back shed has become a catch all for everything we don't want in the house as well as a home for wayward oversized spiders ewwww!.  During a Spring clean out I decided to list the Oak stools on Kijiji, I even had a customer down to negotiations via email.  That's when Frank confessed that he didn't like my cold black metal barstools and was much happier with the Oak ones.  WHAT????  Say it isn't true.  Hmmm, what to do?
I thought about them for a while. Well, actually, I lied awake at night stewing over what I could do to like these suckers again.  Wait, what? Like them again?  Ummmm, the 80's called and they want their barstools back!  Then one Saturday morning I was reading my blog feed feeling envious of the all the great finds other bloggers kept finding in some relative's old barn.  BOOM! that's it!  I want these barstools to look like they had been sitting in the corner of an old barn (or back yard Spider condo in our case).  I had used Miss Mustard Seed's Milk Paint on a couple of projects but I had always used bonding agent to help the paint adhere to the surface.   In the past I had not been ready to give up control to the potential chippiness achieved by not adding bonding agent.

Oh boy Oh boy Oh boy!  This is gonna be fun!
Wait! these are chairs with spindles, ugh!
Ya but they are going to be chippy.
Anyone else have these conversations with themselves?
OMG! Look! it's starting to chip, yippee!!!
This is the look I get from Molly B when I start jumping up and down with excitement.
OK, I got so excited that I missed some steps in my pics.  After the chipping started I sanded off the chips and got the chairs down to a smooth finish.  Then I decided that the "so called barn" I found these old chairs in would be a Dairy Barn … yeah, that's it! So out comes my Dairyland Stencil!
I roughly stencilled the seat of each chair in a light grey.  I wanted these to look old so I used very little paint.
Look!  Aren't they fun!
OK, everything in the house is getting painted in chippy Milk Paint!
I LOVE these stools now! 
When we finally get the kitchen finished I will take a picture of them in place.

JoJo xo

Thursday, December 26, 2013

What else do we do?

Muddaritaville Stencils were born out of my love for signs, and graphics.  I wanted to make it easier to embellish a piece of furniture or paint a sign.  I some of the first items I created for customers were personalized signs, I am obsessed with adding a touch of personalization to creations.

Some of you may have found us for the stencils we create and we are so grateful for that!  On this post I want to share a few of the other items we produce here at Muddaritaville along with a hi light of items we will add to the website in 2014.


This is a sign I painted for my sister for Christmas.
Did I tell you I LOVE signs!


This is a cutting board I created for my sister.  When we aren't busy cutting stencils with our Trotec Laser  we also do personalization.  We will be adding cutting boards to the site in 2014, I'm leaning toward a line of Bamboo cutting boards. (we'll keep you posted)


This another cutting board created for my stepmother Norma.
This board is Bamboo, I love the way it engraves!
Well I had to make one for my kitchen!
This was a special project for a friend of Frank's.  It was a Christmas gift for his friend's wife. This is a picture of her horse, Frank did some work in Photoshop so the image would look good when engraved on the board, while he was doing that I looked up some Horse Quotes. We brought it all together on this one of a kind Gift!
Another one of a kind gift for this couple who purchased their first home in 2013 and are getting married in 2014.


I LOVE creating these one of a kind items that are treasured by their owners. 

I'm so excited for what 2014 will bring!

All the best to you and yours this Holiday Season.


Sunday, August 25, 2013

Somewhere in Time Armoire

I have been hunting on and off for an Armoire that had great lines AND would fit our flat screen TV. Most that I found on Kijiji were too small or plain.  Then one day on Facebook I saw an Armoire that Kathy from Karma Fine Furnishings had posted.  My first thought was "it's gonna be out of my budget"
I did a happy dance when I found out it was in my budget and that it came in two pieces cus I had no idea how we would move it if it was one piece.  The Armoire Gods were looking out for me, well and Kathy too since she negotiated a great price with the owner for me!

Here she is in her former glory ...


She has a patchwork like veneer which was starting to lift in a few areas.  I knew I wanted to use van Gogh embossing plaster on it so I wasn't concerned.

Our next challenge was coming up with a theme for the piece.  Overall we are trying to decorate our little bungalow with a Cottage/Beach feel.   So initially I was looking at embossing a pattern of Ornamental grasses (sea oats) on the front, then I considered butterflies with a motivational saying.  We kept coming back to the fact that it was a TV Armoire and we should give it a movie theme.  In addition to that the piece reminded us of one you might see in a hotel room so we started googling Movie and Hotel themes and one of our favourite movies "Somewhere in Time" came up.  Oh ya!  That's it!  Since this piece is for our personal use and not for sale we weren't worried about using graphics from the movie. 


This is the inspiration for one of stencil images.


I traced the image, rearranged it to fit one of the Armoire doors then I bridged it to create a stencil.
For the right hand door we decided to use a nostalgic logo for the Grand Hotel which is the setting for the movie.

I used an Ultra Cut stencil material which has a sticky back, I tend to use this for large embossing plaster projects and for one time use.
Then I applied the plaster, I learn from every project I do, we should have removed the doors first and worked on a horizontal surface.  It was a hot day so the plaster wanted to run a little when applied on a vertical surface.  No worries, all worked out OK.

Oh, did I mention that I painted the whole Armoire in van Gogh paint, the colour is Halo.
This is not the final colour but I wanted to distress through to white and wood in my final finish.
Above is the piece painted white, and the embossing plaster applied.


Here is a closer shot of the embossing plaster which shows the areas where the plaster ran a bit in the heat (see Elise's tear).  I gave the embossing plaster a light sand to remove any sharp points before painting over.

Here are the doors with one coat of paint over the plaster.
At this point I decided life would be a lot easier if the doors were removed for distressing and so I could paint the interior of the unit. This image above is after the piece is painted and distressed to show the embossed image.  BTW, this van Gogh colour is one of our Muddaritaville Signature colours called Beach Glass.  
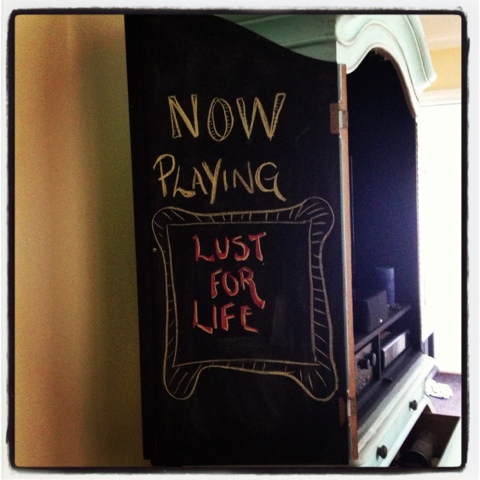
This image shows the interior painted with van Gogh Revenge which is a gorgeous black.  I wanted the TV and components to blend into the background.  I cured the doors with Chalk so they could be used as Chalkboards for messages.  I did not apply any topcoat to the interior at all!  I might regret this in the component area as it might be harder to keep dust free (I'll let ya know)

Here's door #1 with a message. I think I'm going to invest in some Chalk Markers, I broke the chalk about 5 times drawing this little message and there was chalk dust everywhere!

According to Frank I should change the above message daily, yup, I'm right on that!

The doors don't stay open like this they fold right back but this gives you an idea of how the black interior works with the components.

To finish the piece I wet distressed to expose the white base coat, and some wood, then I applied van Gogh Cabinet Glaze.  I could leave it like this the Cabinet Glaze is suitable as a top coat.
I may work with the glaze a bit more and maybe apply wax too but for now I'm happy to live with it a while.  Heck, it only took 4 months to get it to this point!

Tada!


Thank you so much for stopping by!

JoJo 

I'll be partying over here this week